View Featured Offers >>

ELISA Protocol - Specific For Product: 12923

Specific For: PathScan® Stress and Apoptosis Signaling Antibody Array Kit (Fluorescent Readout) #12923

A. Preparing Cell Lysates

  1. Thaw 1X Cell Lysis Buffer #7018 and mix thoroughly. Supplement 1X Cell Lysis Buffer with a Protease Inhibitor Cocktail (100X) #5871. Keep lysis buffer on ice.
  2. Remove media and wash cells once with ice-cold 1X PBS.
  3. Remove PBS and add ice-cold 1X Cell Lysis Buffer. For adherent cells, use 0.5 ml 1X Cell Lysis Buffer #7018 for each plate (10 cm in diameter). Incubate on ice for 2 minutes.
  4. Transfer lysates to a microcentrifuge tube and microcentrifuge at maximum speed for 2 minutes at 4°C.
  5. Transfer the supernatant to a new tube. The supernatant is the cell lysate and may be used immediately or stored at –80°C in single-use aliquots.
  6. Dilute lysates to 0.2 – 1.0 mg/ml in Array Diluent Buffer immediately before performing the assay. Set aside on ice.

B. Assay Procedure

  1. Bring glass slides and blocking buffer to room temperature before use.
  2. Prepare 1X Array Wash Buffer by diluting 20X Array Wash Buffer in deionized water. Dilute 1 ml of 20X Array Wash Buffer with 19 ml of deionized water. Label as 1X Array Wash Buffer. Keep at room temperature.
  3. Prepare 1X Detection Antibody Cocktail as follows:

    For running only 1 slide: Dilute 150 µl of 10X Detection Antibody Cocktail with 1350 µl of Array Diluent Buffer.

    For running 2 slides: Dilute 300 µl of 10X Detection Antibody Cocktail with 2700 µl of Array Diluent Buffer.

  4. Prepare 1X DyLight 680-linked Streptavidin as follows:

    For running only 1 slide: Dilute 150 µl of 10X DyLight 680-linked Streptavidin with 1350 µl of Array Diluent Buffer.

    For running 2 slides: Dilute 300 µl 10X DyLight 680-linked Streptavidin with 2700 µl of Array Diluent Buffer.

    *Keep on ice and protect from light.

  5. Affix the multi-well gasket to the glass slide (see figure at bottom):
    1. Place the multi-well gasket facedown on the bench top (the silicone layer should be facing up). Remove the protective plastic film.
    2. Carefully place the glass slide on top of the multi-well gasket with the nitrocellulose pads facing down while aligning the pads with the openings in the gasket. The orientation line should appear in the upper left hand corner when the slide is oriented vertically.
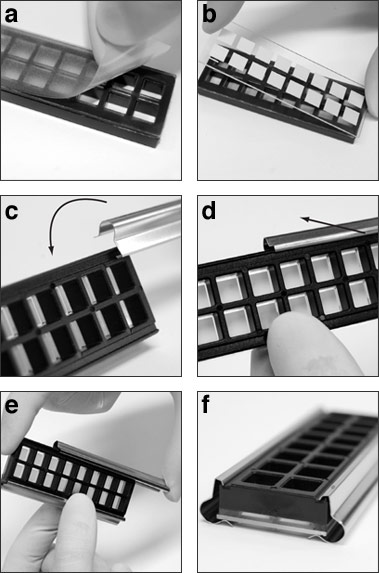
    3. Insert the metal clip into the groove in the gasket and rotate the clip into the locked position. Ensure that the clip is on the same side as the orientation line on the slide.

      NOTE: one of the clips has a small dot etched onto the upper rib to assist with pad designation (see slide assembly photos).

    4. Slide the clip into place.
    5. Snap the unmarked metal clip to the other side of the assembly in the same manner and slide into place.
    6. The assembled array is ready to use.
  6. Add 100 µl Array Blocking Buffer to each well and cover with sealing tape. Incubate for 15 minutes at room temperature on an orbital shaker.

    NOTE: Do not allow the pads to dry out until after step 14.

  7. Decant Array Blocking Buffer by gently flicking out the liquid into a sink or other appropriate waste receptacle. Add 75 µl of diluted lysate to each well and cover with sealing tape. Incubate for 2 hours at room temperature (or overnight at 4°C) on an orbital shaker.
  8. Decant well contents by gently flicking out the liquid into a sink or other appropriate waste receptacle. Add 100 µl 1X Array Wash Buffer to each well and incubate for 5 minutes at room temperature on an orbital shaker. Repeat three more times. Decant well contents.
  9. Add 75 µl 1X Detection Antibody Cocktail to each well and cover with sealing tape. Incubate for 1 hour at room temperature on an orbital shaker.
  10. Wash 4 – 5 minutes with 100 µl 1X Array Wash Buffer as in step 8.

    NOTE: From this point on, keep slide protected from light.

  11. Add 75 µl 1X DyLight 680-linked Streptavidin to each well and cover with sealing tape. Incubate for 30 minutes at room temperature on an orbital shaker.
  12. Wash 4 – 5 minutes with 100 µl 1X Array Wash Buffer as in step 8.
  13. Remove multi-well gasket by pulling the bottom of the metal clips away from the center of the slide, then peeling the slide and gasket apart.
  14. Place the slide face up in a plastic dish (a clean pipette tip box cover works well). Wash once for 10 seconds with 10 ml deionized water.
  15. Remove slide from plastic dish and allow to completely dry.
  16. Capture an image of the slide using a fluorescent digital imaging system capable of exciting at 680 nm and detecting at 700 nm. Quantify spot intensities using commercially available array image analysis software.

Slide Assembly Photos

DyLight is a registered trademark of Thermo Fisher Scientific Inc. and its subsidiaries.

posted November 2013